With the 2018-2019 school year in the rearview mirror, I spent a little time last week reflecting on the year that was. In doing so, I realized that I am very proud of the effort I put into trying new activities in my classroom. However, this is also one of my greatest weakness as it also makes my life harder with extra planning and, with 4 different preps last year, it can drove me a little crazy too!!! After I reflected on all the new things I did this year, I wanted to bring to you some of the BEST new labs/activities I tried in my classroom in case you looking for new ideas for your classroom. (I know it’s only June, but I know someone out there is already thinking about next year!) Now, not every new idea I tried this year worked out well, but the labs I’ve listed below are definitely keepers that I will be using in the years to come. Last year I taught Biology (regular level and an honors level, Earth Science, and Anatomy and I’ve included activities for each of these classes.
- Bio: Bubble Gum Lab– I did this as my first lab in my Biology class this year, to introduce lab expectations and lab report requirements. In my regula
 r Bio class, I gave my students several brands of chewing gum and told them to design an experiment that would find which brand blew the biggest bubble. In my Honors Bio class, I gave my students the different brands of gum, but they designed an experiment that tested anything they wanted. Some tests bubble size and some tested which brand held its flavor the longest. I’m so glad I did this lab because it’s inquiry-based, students learn and practice experimental design, it has easy set up, and it’s FUN! You can find more descriptions abou
 t this lab on Mrs. Miko’s wonderful blog: Refuse to Reinvent the Wheel (https://refusetoreinventthewheel.wordpress.com/2015/01/04/the-ultimate-bubble-blowing-champion/)
 - Bio: Balloon Diffusion Lab– Most years when I teach cell transport through the cell membrane (diffusion, osmosis, active transpo
 rt), I do a lab where students put starch and water in a little piece of dialysis tubing, tying it off, put it in a glass of water, and drop iodine into the glass. The students then watch the iodine diffuse into the dialysis tube turning the tube blackish/blue. I really love this lab, BUT my biology class had some issues with appropriate lab behavior this year so did a balloon diffusion lab instead. I adapted this pdf from Flinn scientific (https://www.flinnsci.com/api/library/Download/d38c19c446cc40d9b52270ae3187e268) to fit my needs and worked pretty great. Essentially, you put different extracts into the balloons, the smells from the extracts diffuse out, and students try to get what smell each balloon contains. This particular class probably learned more about diffusion from a simple demonstration like this than from the dialysis tubing lab, and it was a great reminder for me that more complex labs don’t necessarily mean better learning.
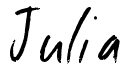
 - Earth Science: Erosion Lab– In a similar vein to the balloon lab, I did this lab in attempt to make my life easier. (I had 4 different lab classes to prep for last year and sometimes you just need to make your life more MANAGEABLE amiright???) In my earth science classes I have tried so many different landslide labs when we learn about erosion. They have all been rather messy and time consuming and I am sick of hauling very heavy bags of sand from Home Depot into my classroom! This FREE lab from Ari at The Science Penguin (https://thesciencepenguin.com/2012/11/soil-the-capacity-to-retain-water.html) worked well and met my needs! This lab focuses on the water retention of different soils and not on erosion specifically, but I added some additional analysis questions and my high school students were able to draw connections between the two concepts.
- Earth Science: Sedimentary Rock Lab– I’ve tried several times and without much

Sedimentary “rocks” made of graham crackers and sugar water success to make sedimentary rocks in plastic bottles or paper cups with different materials found outside. It takes too long for the materials to dry and turn into “rocks” and my students never really get a clear picture of sedimentary rock formation. This year I used a lab I found TPT from Mrs. Ruff (https://www.teacherspayteachers.com/Product/Sedimentary-Rock-Lab-Edible-Rock-Cycle-2085993) We were able to clearly see graded bedding in the first part of the lab and using graham crackers and sugar water to make sedimentary rocks in the second part of the lab gave my students a much better understanding of weathering, erosion, compaction, and cementation.

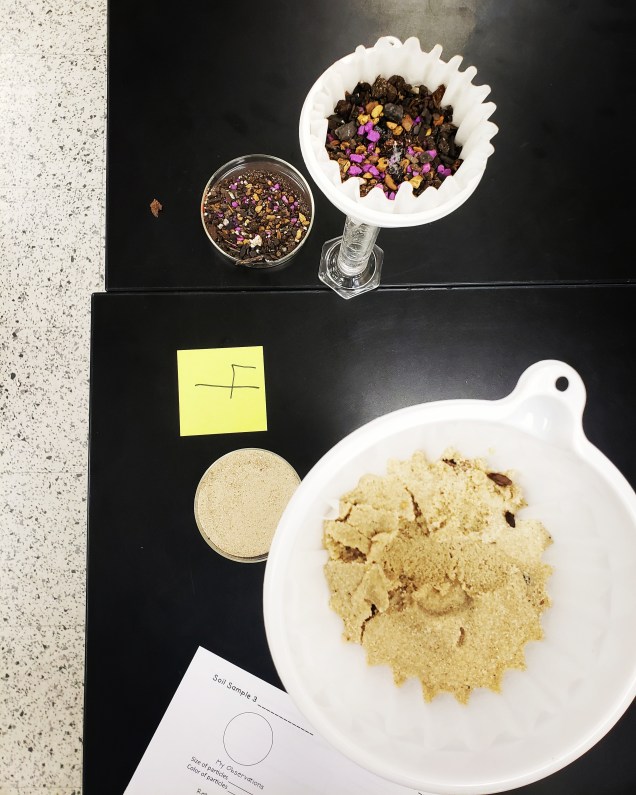
I put a mixture of different soils and sand in a bucket of water and then poured a little bit in a clear cup for each lab group. Students then timed how long it took for the different materials to settle out and showed them how graded bedding works. - Anatomy: Banana Autopsy– At the beginning of the year in anatomy, it is very
 important for students to learn and retain anatomical terms. Throughout the year those words are used over and over again to describe the location of everything in the body, so this year I wanted to do more activities for students to practice using anatomical terms like lateral, medial, anterior, and posterior. This banana dissection lab was the MOST FUN! It’s cheap, not at all messy, and your students will love it. There are plenty of free resources you can find for this activity. I Googled “banana autopsy” and adapted one of the first resources I found to fit my needs.
- Anatomy: Blood Vessel Lab– There were a lot of new things I tried i

You can use a piece of paper with a small hole in it to see the capillaries in your eyeball! n my anatomy class this year but I am including this lab simply because this was something I had never done and I loved it! When teaching blood vessels, I usually have them learn how to take their blood pressure with a blood pressure cuff and then we just spend time looking at different pics of arteries, veins, and capillaries and talking about their differences and functions. However, this lab gives students a hands-on and visual way of studying capillaries and veins in a way I had never done before. The lab involves seeing your capillaries by looking through a tiny hole in a piece of paper and using a rudimentary way to measure venous blood pressure so students can see the difference compared to arterial pressure. You can find this lab on TPT here: https://www.teacherspayteachers.com/Product/Arteries-Veins-and-Capillaries-Lab-585345. Here is the YouTube video I used to show my students how to see their own capillaries! https://www.youtube.com/watch?v=L_W-IXqoxHA&feature=youtu.be.
If you have any questions about these activities, please feel free to comment below or send me a message. Hope you’re all having a super summer!